官方:https://developer.android.com/reference/android/widget/GridLayout
Android GridLayout 用于以矩形网格的形式显示元素和视图。GirdLayout 和 GridView 是两个完全不同的术语,用于其他目的。GridView 是一个视图,而 GridLayout 是一个可以在其中容纳各种视图的布局。使用 GridView,您可以显示来自适配器的项目。
GridLayout 允许您在布局内放置许多视图和元素,然后设置它们的样式。它允许您设置网格的行数和列数。因此,通过本文,我们将尝试了解如何在设计布局时使用 GridLayout。
关于网格布局
Android 为您提供了使用各种类型的布局来设置应用程序屏幕样式的功能。一些最常用的布局是 LinearLayout、Constraint Layout、RelativeLayout 和 GridLayout。
假设您需要线性显示元素,无论是水平还是垂直;你可以使用线性布局。同样,如果您希望在行和列中显示元素和视图,您可以使用 GridLayout。
让我们看看如何在 Android 中创建 GridLayout。
XML 代码:
<GridLayout xmlns:android="http://schemas.android.com/apk/res/android"
    xmlns:tools="http://schemas.android.com/tools"
    android:layout_width="match_parent"
    android:layout_height="match_parent"
    android:rowCount="4"
    android:columnCount="2"
    android:background="#3F51B5"
    tools:context=".MainActivity">

</GridLayout>
现在让我们看看如何在 GridLayout 中添加多个子元素。子元素可以是任何视图元素,例如 Buttons、ImageViews、TextViews 等。下面是一个示例,向您展示如何在 GridLayout 中添加子元素。
代码:
<?xml version="1.0" encoding="utf-8"?>
<GridLayout xmlns:android="http://schemas.android.com/apk/res/android"
    xmlns:tools="http://schemas.android.com/tools"
    android:layout_width="match_parent"
    android:layout_height="match_parent"
    android:rowCount="4"
    android:columnCount="2"
    android:background="#3F51B5"
    tools:context=".MainActivity">

    <ImageView
        android:layout_height="90dp"
        android:layout_width="130dp"
        android:layout_margin="10dp"
        android:src="@drawable/image_1"
        />

    <ImageView
        android:layout_height="90dp"
        android:layout_width="200dp"
        android:layout_margin="10dp"
        android:src="@drawable/image_2"
        />

    <ImageView
        android:layout_height="90dp"
        android:layout_width="130dp"
        android:layout_margin="10dp"
        android:src="@drawable/image_3"
        />

    <ImageView
        android:layout_height="90dp"
        android:layout_width="200dp"
        android:layout_margin="10dp"
        android:src="@drawable/image_4"
        />


</GridLayout>
所以在上面的代码中,我们在你的 GridLayout 中添加了四个子元素。
Android GridLayout 规范
1. 行和列规范
使用行和列规范,您可以指定行和列的需要方式以及元素的方向。为此,您可以使用rowSpec和columnSpec布局参数。
例子:
var rowSpec: GridLayout.Spec!

var columnSpec: GridLayout.Spec!
2. 默认单元格分配
如果元素没有指定它需要出现的位置,那么 GridLayout 会自动分配它的位置。组件的位置基于其方向、rowCount和columnCount属性。
例子:
open fun setOrientation(orientation: Int): Unit

open fun setRowCount(rowCount: Int): Unit

open fun setColumnCount(columnCount: Int): Unit
3. 空间
要在网格元素之间提供空间,可以使用topMargin、bottomMargin、leftMargin和rightMargin布局参数。
例子:
var topMargin: Int

var bottomMargin: Int

var leftMargin: Int

var rightMargin: Int
设置上述值后,您需要调用以下方法。
ViewGroup#setLayoutParams(LayoutParams)
Android中GridLayout的属性
| 属性名称 | 描述 |
| android:columnCount | “columnCount”属性用于指定在定位元素时可以获得的最大列数。 |
| android:columnOrderPreserved | “columnOrderPreserved”为真时使列边界跟随列索引。 |
| android:rowCount | “rowCount”指定了在定位元素时可以达到的最大行数。 |
| android:rowOrderPreserved | 当设置为 true 时,“rowOrderPreserved”使行边界跟随行索引。 |
| android:useDefaultMargins | “useDefaultMargins”属性用于指定是否为您的 GridLayout 使用默认边距。它具有真值或假值。 |
Android GridLayout的实现
现在,让我们尝试弄清楚如何在 Android 中创建 GridLayout。要实现 GridLayout,您需要很好地遵循以下步骤。
1:开始,启动你的 Android Studio 并点击创建一个新项目。
2:选择 Empty Activity,然后为您的应用程序提供一个名称。
3:现在,打开您的 activity_main.xml 并粘贴下面的代码。
代码:activity_main.xml
<?xml version="1.0" encoding="utf-8"?>
<GridLayout xmlns:android="http://schemas.android.com/apk/res/android"
    xmlns:tools="http://schemas.android.com/tools"
    android:layout_width="match_parent"
    android:layout_height="match_parent"
    android:rowCount="4"
    android:columnCount="2"
    android:background="#3F51B5"
    tools:context=".MainActivity">

    <ImageView
        android:layout_height="90dp"
        android:layout_width="130dp"
        android:layout_margin="10dp"
        android:src="@drawable/image_1"
        />

    <ImageView
        android:layout_height="90dp"
        android:layout_width="200dp"
        android:layout_margin="10dp"
        android:src="@drawable/image_2"
        />

    <ImageView
        android:layout_height="90dp"
        android:layout_width="130dp"
        android:layout_margin="10dp"
        android:src="@drawable/image_3"
        />

    <ImageView
        android:layout_height="90dp"
        android:layout_width="200dp"
        android:layout_margin="10dp"
        android:src="@drawable/image_4"
        />

    <ImageView
        android:layout_height="90dp"
        android:layout_width="130dp"
        android:layout_margin="10dp"
        android:src="@drawable/image_5"
        />

    <ImageView
        android:layout_height="90dp"
        android:layout_width="220dp"
        android:layout_margin="10dp"
        android:src="@drawable/image_6"
        />

    <ImageView
        android:layout_height="90dp"
        android:layout_width="130dp"
        android:layout_margin="10dp"
        android:src="@drawable/image_7"
        />

    <ImageView
        android:layout_height="90dp"
        android:layout_width="200dp"
        android:layout_margin="10dp"
        android:src="@drawable/image_8"
        />
    <ImageView
        android:layout_height="90dp"
        android:layout_width="130dp"
        android:layout_margin="10dp"
        android:src="@drawable/image_9"
        />
    <ImageView
        android:layout_height="90dp"
        android:layout_width="130dp"
        android:layout_margin="10dp"
        android:layout_marginLeft="40dp"
        android:src="@drawable/image_10"
        />


</GridLayout>
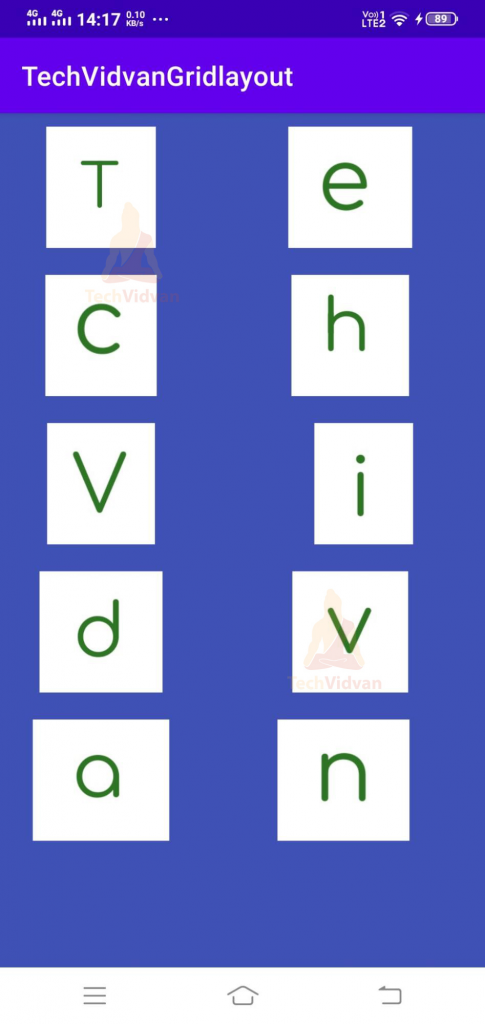
是的。您的 GridLayout 现在已在您的 Android 应用程序中成功实现。现在只需运行您的应用程序,您就可以看到您的 GridLayout 已成功创建。由于我们将 rowCount 保持为 4,column count 保持为 2。因此我们看到每行中有两个块。

概括
通过本文,您了解了 GridLayout 是什么以及它与 GridView 的不同之处。稍后,您看到了 GridLayout 的规范、属性和方法。最后,您看到了如何在您的 Android 应用程序中实现 GridLayout。


