GCC 和 Make
编译、链接和构建C/C++ 应用程序
GCC(大写)指的是 GNU 编译器集合。这是一个开源编译器套件,包括 C、C++、Objective C、Fortran、Ada、Go 和 Java 的编译器。gcc(小写)是 GNU Compiler Collection 中的 C 编译器。历史上 GCC 和 gcc 可以互换使用,但由于 GCC 包含的工具比 C 编译更多,因此正在努力将这两个术语分开。
本节中的文档将参考 gcc,即 GNU C 编译器。目的是提供对常见操作和选项的快速查找。GCC 项目在https://gcc.gnu.org上有详细的文档,其中记录了安装、一般用法和每个命令行选项。有关此处未回答的任何问题,请参阅官方 GCC 文档。如果 GCC 文档中某个主题不清楚,请索取具体示例。
“Hello World” 使用常用命令行选项#
对于具有单个源文件的程序,使用 gcc 很简单。
/* File name is hello_world.c */
#include <stdio.h>

int main(void)
{
    int i;
    printf("Hello world!\n");
}
从命令行编译文件 hello_world.c:
gcc hello_world.c
然后 gcc 将编译程序并将可执行文件输出到文件 a.out。如果要命名可执行文件,请使用 -o 选项。
gcc hello_world.c -o hello_world
然后可执行文件将被命名为 hello_world 而不是 a.out。默认情况下,gcc 发出的警告并不多。gcc 有许多警告选项,最好查看 gcc 文档以了解可用的内容。使用“-Wall”是一个很好的起点,涵盖了许多常见问题。
gcc -Wall hello_world.c -o hello_world
输出:
hello_world.c: In function ‘main’:
hello_world.c:6:9: warning: unused variable ‘i’ [-Wunused-variable]
     int i;
         ^
在这里,我们看到我们现在收到一个警告,即变量“i”已声明但在函数中根本没有使用。
如果你打算使用调试器来测试你的程序,你需要告诉 gcc 包含调试信息。使用“-g”选项进行调试支持。
gcc -Wall -g hello_world.c -o hello_world
hello_world 现在有 GDB 支持的调试信息。如果您使用不同的调试器,您可能需要使用不同的调试选项,以便正确格式化输出。有关更多调试选项,请参阅官方 gcc 文档。
默认情况下 gcc 编译代码以便于调试。gcc 可以优化输出,以便最终的可执行文件产生相同的结果,但性能更快,并且可能会产生更小的可执行文件。’-O’ 选项启用优化。在 O 之后添加几个公认的限定词来指定优化级别。每个优化级别都会添加或删除一组命令行选项列表。“-O2”、“-Os”、“-O0”和“-Og”是最常见的优化级别。
gcc -Wall -O2 hello_world.c -o hello_world
“-O2”是生产就绪代码最常见的优化级别。它在性能提升和最终可执行文件大小之间提供了极好的平衡。
gcc -Wall -Os hello_world.c -o hello_world
‘-Os’ 类似于 ‘-O2’,除了某些通过增加可执行文件大小来提高执行速度的优化被禁用。如果最终的可执行文件大小对您很重要,请尝试“-Os”并查看最终可执行文件中是否存在明显的大小差异。
gcc -Wall -g -Og hello_world.c -o -hello_world
请注意,在上面带有“-Os”和“-O2”的示例中,删除了“-g”选项。那是因为当您开始告诉编译器优化代码时,某些代码行实际上可能不再存在于最终的可执行文件中,从而使调试变得困难。但是,也有某些错误仅在优化打开时发生的情况。如果您想调试您的应用程序并让编译器优化代码,请尝试使用“-Og”选项。这告诉 gcc 执行不应妨碍调试体验的所有优化。
gcc -Wall -g -O0 hello_world.c -o hello_world
“-O0”比“-Og”执行的优化更少。这是 gcc 默认使用的优化级别。如果您想确保禁用优化,请使用此选项。
确定 gcc 版本#
当参考 gcc 的文档时,您应该知道您正在运行哪个版本的 gcc。GCC 项目对每个版本的 gcc 都有一个手册,其中包括在该版本中实现的功能。使用“-v”选项来确定您正在运行的 gcc 版本。
gcc -v
示例输出:
Using built-in specs.
COLLECT_GCC=/usr/bin/gcc
COLLECT_LTO_WRAPPER=/usr/libexec/gcc/x86_64-redhat-linux/5.3.1/lto-wrapper
Target: x86_64-redhat-linux
Configured with: ../configure --enable-bootstrap --enable-languages=c,c++,objc,obj-c++,fortran,ada,go,lto --prefix=/usr --mandir=/usr/share/man --infodir=/usr/share/info --with-bugurl=http://bugzilla.redhat.com/bugzilla --enable-shared --enable-threads=posix --enable-checking=release --enable-multilib --with-system-zlib --enable-__cxa_atexit --disable-libunwind-exceptions --enable-gnu-unique-object --enable-linker-build-id --with-linker-hash-style=gnu --enable-plugin --enable-initfini-array --disable-libgcj --with-default-libstdcxx-abi=gcc4-compatible --with-isl --enable-libmpx --enable-gnu-indirect-function --with-tune=generic --with-arch_32=i686 --build=x86_64-redhat-linux
Thread model: posix
gcc version 5.3.1 20160406 (Red Hat 5.3.1-6) (GCC)
在这个例子中,我们看到我们正在运行 gcc 版本 5.3.1。然后你会知道参考 GCC 5.3 手册。如果您遇到特定于版本的问题,在提问时包含您的 gcc 版本也很有帮助。
| 版本 | 发布日期 |
|---|---|
| 7.1 | 2017-05-02 |
| 6.3 | 2016-12-21 |
| 6.2 | 2016-08-22 |
| 5.4 | 2016-06-03 |
| 6.1 | 2016-04-27 |
| 5.3 | 2015-12-04 |
| 5.2 | 2015-07-16 |
| 5.1 | 2015-04-22 |
| 4.9 | 2014-04-22 |
| 4.8 | 2013-03-22 |
| 4.7 | 2012-03-22 |
| 4.6 | 2011-03-25 |
| 4.5 | 2010-04-14 |
| 4.4 | 2009-04-21 |
| 4.3 | 2008-03-05 |
| 4.2 | 2007-05-13 |
| 4.1 | 2006-02-28 |
| 4.0 | 2005-04-20 |
| 3.4 | 2004-04-18 |
| 3.3 | 2003-05-13 |
| 3.2 | 2002-08-14 |
| 3.1 | 2002-05-15 |
| 3.0 | 2001-06-18 |
| 2.95 | 1999-07-31 |
| 2.8 | 1998-01-07 |
| 2.7 | 1995-06-16 |
| 2.6 | 1994-07-14 |
| 2.5 | 1993-10-22 |
| 2.4 | 1993-05-17 |
| 2.3 | 1992-10-31 |
| 2.2 | 1992-06-08 |
| 2.1 | 1992-03-24 |
| 2.0 | 1992-02-22 |
| 1.42 | 1992-09-20 |
| 1.41 | 1992-07-13 |
| 1.40 | 1991-06-01 |
| 1.39 | 1991-01-16 |
| 1.38 | 1990-12-21 |
| 1.37 | 1990-02-11 |
| 1.36 | 1989-09-24 |
| 1.35 | 1989-04-26 |
| 1.34 | 1989-02-23 |
| 1.33 | 1989-02-01 |
| 1.32 | 1988-12-21 |
| 1.31 | 1988-11-19 |
| 1.30 | 1988-10-13 |
| 1.29 | 1988-10-06 |
| 1.28 | 1988-09-14 |
| 1.27 | 1988-09-05 |
| 1.26 | 1988-08-18 |
| 1.25 | 1988-08-03 |
| 1.24 | 1988-07-02 |
| 1.23 | 1988-06-26 |
| 1.22 | 1988-05-22 |
| 1.21 | 1988-05-01 |
| 1.20 | 1988-04-19 |
| 1.19 | 1988-03-29 |
| 1.18 | 1988-02-04 |
| 1.17 | 1988-01-09 |
| 1.16 | 1987-12-19 |
| 1.15 | 1987-11-28 |
| 1.14 | 1987-11-06 |
| 1.13 | 1987-10-12 |
| 1.12 | 1987-10-03 |
| 1.11 | 1987-09-05 |
| 1.10 | 1987-08-22 |
| 1.9 | 1987-08-18 |
| 1.8 | 1987-08-10 |
| 1.7 | 1987-07-21 |
| 1.6 | 1987-07-02 |
| 1.5 | 1987-06-18 |
| 1.4 | 1987-06-13 |
| 1.3 | 1987-06-10 |
| 1.2 | 1987-06-01 |
| 1.1 | 1987-05-24 |
| 1.0 | 1987-05-23 |
| 0.9 | 1987-03-22 |
编译、链接和构建C/C++ 应用程序
1. GCC(GNU 编译器集合)
1.1 GCC 的简史和介绍
最初的GNU C 编译器(GCC) 由GNU 项目的创始人 Richard Stallman 开发。Richard Stallman 于 1984 年创立了 GNU 项目,旨在创建一个完整的类 Unix 操作系统作为自由软件,以促进计算机用户和程序员之间的自由与合作。
GCC,以前用于“ GNU C 编译器”,随着时间的推移已经发展到支持多种语言,例如 C ( gcc)、C++ ( g++)、Objective-C、Objective-C++、Java ( gcj)、Fortran ( gfortran)、Ada ( gnat)、Go ( gccgo)、OpenMP、Cilk Plus 和 OpenAcc。它现在被称为“ GNU 编译器集合”。GCC 的母站是http://gcc.gnu.org/。当前版本为 GCC 7.3,于 2018-01-25 发布。
GCC 是所谓的“ GNU 工具链”的关键组件,用于开发应用程序和编写操作系统。GNU 工具链包括:
- GNU Compiler Collection (GCC):一个支持多种语言的编译器套件,例如 C/C++ 和 Objective-C/C++。
- GNU Make:用于编译和构建应用程序的自动化工具。
- GNU Binutils:一套二进制实用工具,包括链接器和汇编器。
- GNU 调试器 (GDB)。
- GNU Autotools:一个构建系统,包括 Autoconf、Autoheader、Automake 和 Libtool。
- GNU Bison:解析器生成器(类似于 lex 和 yacc)。
GCC 是可移植的并且可以在许多操作平台上运行。GCC(和 GNU 工具链)目前在所有 Unix 上都可用。它们也被移植到 Windows(通过 Cygwin、MinGW 和 MinGW-W64)。GCC 也是一个交叉编译器,用于在不同平台上生成可执行文件。
GCC 版本
各种 GCC 版本是:
- GCC 版本 1 (1987):支持 C 的初始版本。
- GCC 版本 2 (1992):支持 C++。
- GCC 版本 3 (2001):合并 ECGS(实验性 GNU 编译器系统),改进优化。
- GCC 版本 4 (2005):
- GCC 版本 5(2015):
- GCC 版本 6 (2016):
- GCC 版本 7 (2017):
C++ 标准支持
有多种 C++ 标准:
- C++98
- C++11(又名 C++0x)
- C++14(又名 C++1y)
- C++17(又名 C++1z)
- C++2a(2020 年计划的下一个标准)
对于 6.1 之前的 GCC 版本,默认模式是 C++98,对于 GCC 6.1 及更高版本,默认模式是 C++14。您可以使用命令行标志-std显式指定 C++ 标准。例如,
-std=c++98, 或-std=gnu++98(带有 GNU 扩展的 C++98)-std=c++11, 或-std=gnu++11(带有 GNU 扩展的 C++11)-std=c++14,或-std=gnu++14(带有 GNU 扩展的 C++14),GCC 6.1 及更高版本的默认模式。-std=c++17,或-std=gnu++17(带有 GNU 扩展的 C++17),实验性的。-std=c++2a,或-std=gnu++2a(带有 GNU 扩展的 C++2a),实验性的。
1.2 在 Unix 上安装 GCC
包括 GCC 在内的 GNU 工具链包含在所有 Unix 中。它是大多数类 Unix 操作系统的标准编译器。
1.3 在 Mac OS X 上安装 GCC
打开终端,然后输入“ gcc --version”。如果gcc没有安装,系统会提示你安装gcc。
$ gcc --version
......
Target: x86_64-apple-darwin14.5.0   // 64-bit target codes
Thread model: posix
1.4 在 Windows 上安装 GCC
对于 Windows,您可以安装 Cygwin GCC、MinGW GCC 或 MinGW-W64 GCC。阅读“如何安装 Cygwin 和 MinGW ”。
- Cygwin GCC:Cygwin 是一个类 Unix 环境和 Microsoft Windows 的命令行界面。Cygwin 非常庞大,包括大多数 Unix 工具和实用程序。它还包括常用的 Bash shell。
- MinGW:MinGW(Minimalist GNU for Windows)是 GNU Compiler Collection (GCC) 和 GNU Binutils 的一个端口,用于 Windows。它还包括 MSYS(最小系统),它基本上是一个 Bourne shell ( )。
bash - MinGW-W64:MinGW 的一个分支,支持 32 位和 64 位窗口。
Cygwin下的各种GCC
Cygain/MinGW下有很多GCC。要区分这些变化,您需要了解以下内容:
- Windows/Intel 使用这些指令集: x86 是 32 位指令集;i868 是 x86 的 32 位增强版;x86_64(或 amd64)是 64 位指令集。
- 32 位编译器/程序可以在 32 位或 64 位(向后兼容)Windows 上运行,但 64 位编译器只能在 64 位 Windows 上运行。
- 64 位编译器可能会生成 32 位或 64 位的目标。
- 如果您使用 Cygwin 的 GCC,则目标可能是原生 Windows 或 Cygwin。如果目标是原生Windows,则代码可以在Windows下分发和运行。但是,如果目标是 Cygwin,要分发,您需要分发 Cygwin 运行时环境(
cygwin1.dll)。这是因为 Cygwin 是 Windows 下的 Unix 模拟器。
MinGW-W64 目标 32/64 位原生 Windows
MinGW-W64(MinGW 的一个分支,可在http://mingw-w64.org/doku.php获得)支持 32 位和 64 位本机 Windows 的目标。您可以通过选择这些包(在“devel”类别下)在“Cygwin”下安装“MinGW-W64”:
mingw64-x86_64-gcc-core:用于本机 64 位 Windows 目标的 64 位 C 编译器。可执行文件是“x86_64-w64-mingw32-gcc”。mingw64-x86_64-gcc-g++:用于本机 64 位 Windows 目标的 64 位 C++ 编译器。可执行文件是“x86_64-w64-mingw32-g++”。mingw64-i686-gcc-core:用于本机 32 位 Windows 目标的 64 位 C 编译器。可执行文件是“i686-w64-mingw32-gcc”。mingw64-i686-gcc-g++:用于本机 32 位 Windows 目标的 64 位 C++ 编译器。可执行文件是“i686-w64-mingw32-g++”。
笔记:
- 我建议您安装“
mingw64-x86_64-gcc-core”和“mingw64-x86_64-gcc-g++”以提供本机 64 位 Windows 代码,但跳过“mingw64-i686-gcc-core”和“mingw64-i686-gcc-g++”,除非您需要生成 32 位 Windows 应用程序。 - 对于 64 位 Java 中的 JNI(Java Native Interface),您需要使用“
x86_64-w64-mingw32-gcc”或“x86_64-w64-mingw32-g++”来生成 64 位本机 Windows 代码。
运行可执行文件并检查版本:
// Target 64-bit native Windows
$ x86_64-w64-mingw32-gcc --version
x86_64-w64-mingw32-gcc (GCC) 6.4.0

$ x86_64-w64-mingw32-gcc -v
Using built-in specs.
COLLECT_GCC=x86_64-w64-mingw32-gcc
COLLECT_LTO_WRAPPER=/usr/lib/gcc/x86_64-w64-mingw32/6.4.0/lto-wrapper.exe
Target: x86_64-w64-mingw32
Configured with: .....
Thread model: posix
gcc version 6.4.0 (GCC)

$ x86_64-w64-mingw32-g++ --version
x86_64-w64-mingw32-g++ (GCC) 6.4.0

// Target 32-bit native Windows
$ i686-w64-mingw32-gcc --version
i686-w64-mingw32-gcc (GCC) 6.4.0

$ i686-w64-mingw32-g++ --version
i686-w64-mingw32-g++ (GCC) 6.4.0
Cygwin 中的其他 GCC
Cygwin 中的其他 GCC 包有:
gcc-core, gcc-g++:基本 64 位 C/C++ 编译器目标 64 位 Cygwin。您可能也应该安装这两个软件包。但是,要分发生成的代码,您需要分发 Cygwin 运行时环境 (cygwin1.dll)。这是因为 Cygwin 是 Windows 下的 Unix 模拟器。cygwin32-gcc-core, cygwin32-gcc-g++: 用于目标 32 位 Cygwin 的旧 32 位 C/C++ 编译器(被gcc-code和gcc-g++? 废弃)。mingw-gcc-core, mingw-gcc-g++:用于 32 位 Windows 的旧版 MinGW 32 位 C/C++ 编译器(被 MinGW-W64 包淘汰?)。
1.5 安装后
版本
--version您可以通过选项显示 GCC 的版本:
$ gcc --version
gcc (GCC) 6.4.0

$ g++ --version
g++ (GCC) 6.4.0
更多细节可以通过-v选项获得,例如,
$ gcc -v
Using built-in specs.
COLLECT_GCC=gcc
COLLECT_LTO_WRAPPER=/usr/lib/gcc/x86_64-pc-cygwin/6.4.0/lto-wrapper.exe
Target: x86_64-pc-cygwin
Configured with: ......
Thread model: posix
gcc version 6.4.0 (GCC)

$ g++ -v
Using built-in specs.
COLLECT_GCC=g++
COLLECT_LTO_WRAPPER=/usr/lib/gcc/x86_64-pc-cygwin/6.4.0/lto-wrapper.exe
Target: x86_64-pc-cygwin
Configured with: ......
Thread model: posix
gcc version 6.4.0 (GCC)
帮助
--help您可以通过选项获取帮助手册。例如,
$ gcc --帮助
手册页
您可以通过该实用程序阅读 GCC 手册页(或手册页):man
$ man gcc
// 或
$ man g++
// 按空格键进入下一页,或 'q' 退出。
在 CMD 或 Bash shell 下阅读手册页可能很困难。您可以通过以下方式生成文本文件:
$男人 gcc | col -b > gcc.txt
需要该col实用程序来去除退格键。(对于 Cygwin,它在“Utils”、“util-linux”包中可用。)
或者,您可以查找在线手册页,例如http://linux.die.net/man/1/gcc。
GCC 手册页保存在“ usr/share/man/man1”下。
$ whereis gcc
gcc: /usr/bin/gcc.exe /usr/lib/gcc /usr/share/man/man1/gcc.1.gz
1.6 入门
GNU C 和 C++ 编译器分别称为gcc和g++。
编译/链接一个简单的 C 程序 – hello.c
下面是 Hello-world C 程序hello.c:
// hello.c
#include <stdio.h>

int main() {
    printf("Hello, world!\n");
    return 0;
}编译hello.c:
> gcc hello.c
  // 将源文件 hello.c 编译并链接成可执行的 a.exe (Windows) 或 a (Unixes)
默认输出可执行文件称为“ a.exe”(Windows)或“ a.out”(Unixes 和 Mac OS X)。
运行程序:
// (Windows) 在 CMD shell
> a

// (Unixes / Mac OS X) 在 Bash Shell - 包括当前路径 (./)
$ chmod a+x a.out
$ ./a.out
Unix 和 Bash Shell 的注意事项:
- 在 Bash shell 中,默认 PATH 不包括当前工作目录。因此,您需要
./在命令中包含当前路径 ( )。(Windows 会自动将当前目录包含在 PATH 中;而 Unix 不会 – 您需要将当前目录明确包含在 PATH 中。) - 您还需要包括文件扩展名(如果有),即“
./a.out”。 - 在 Unix 中,输出文件可以是“
a.out”或简单的“a”。此外,您需要通过命令“ ”将可执行文件模式(x)分配给可执行文件“ ”(将可执行文件模式“ ”添加到所有用户“ ”)。a.outchmod a+x filename+xa+x
要指定输出文件名,请使用-o选项:
// (Windows) In CMD shell
> gcc -o hello.exe hello.c
  // Compile and link source file hello.c into executable hello.exe
> hello
  // Execute hello.exe under CMD shell

// (Unixes / Mac OS X) In Bash shell
$ gcc -o hello hello.c
$ chmod a+x hello
$ ./hello
Unix 的注意事项:
- 在 Unix 中,我们通常省略
.exe文件扩展名(仅适用于 Windows),并将输出可执行文件简单地命名为hello(通过命令“gcc -o hello hello.c”。 - 您需要通过命令“
chmod a+x hello”指定可执行文件模式。
编译/链接一个简单的 C++ 程序 – hello.cpp
// hello.cpp
#include <iostream>
using namespace std;

int main() {
   cout << "Hello, world!" << endl;
   return 0;
}需要使用g++编译C++程序,如下。我们使用-o选项来指定输出文件名。
// (Windows) In CMD shell
> g++ -o hello.exe hello.cpp
   // Compile and link source hello.cpp into executable hello.exe
> hello
   // Execute under CMD shell

// (Unixes / Mac OS X) In Bash shell
$ g++ -o hello hello.cpp
$ chmod a+x hello
$ ./hello
更多 GCC 编译器选项
一些常用的 GCC 编译器选项是:
$ g++ -Wall -g -o Hello.exe Hello.cpp
-o: 指定输出的可执行文件名。-Wall:打印“all”警告信息。-g: 生成附加的符号调试信息以供gdb调试器使用。
分别编译和链接
上述命令将源文件编译为目标文件,并link与其他目标文件和系统库一起编译为可执行文件。您可以将编译和链接分为两个步骤,如下所示:
// Compile-only with -c option
> g++ -c -Wall -g Hello.cpp
// Link object file(s) into an executable
> g++ -g -o Hello.exe Hello.o
选项包括:
-c: C编译成目标文件“Hello.o”。默认情况下,目标文件与源文件同名,扩展名为“.o”(无需指定-o选项)。没有与其他目标文件或库的链接。- 当输入文件是目标文件“
.o”(而不是源文件“.cpp”或“.c”)时执行链接。GCC 使用一个单独的链接器程序(称为ld.exe)来执行链接。
编译和链接多个源文件
假设您的程序有两个源文件:file1.cpp, file2.cpp. 您可以在一个命令中编译所有这些:
> g++ -o myprog.exe file1.cpp file2.cpp
但是,我们通常将每个源文件单独编译成目标文件,并在后期将它们链接在一起。在这种情况下,一个文件中的更改不需要重新编译其他文件。
> g++ -c file1.cpp
> g++ -c file2.cpp
> g++ -o myprog.exe file1.o file2.o
编译成共享库
要将 C/C++ 程序编译并链接到共享库(".dll"在 Windows 中,".so"在 Unix 中),请使用-sharedoption。例如阅读“ Java Native Interface ”。
1.7 GCC编译过程

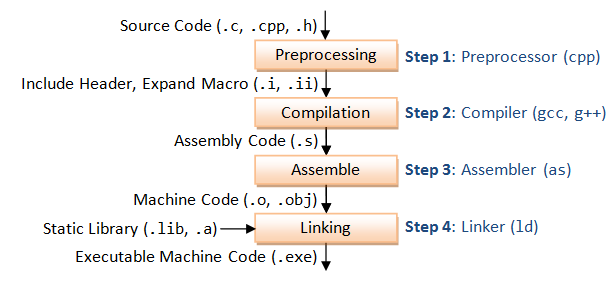
如上图所示,GCC 分 4 步将 C/C++ 程序编译为可执行文件。例如,一个“ gcc -o hello.exe hello.c”执行如下:
- 预处理:通过 GNU C 预处理器 (
cpp.exe),它包括头文件 (#include) 并扩展宏 (#define)。> cpp hello.c > 你好.i生成的中间文件“hello.i”包含扩展的源代码。 - 编译:编译器将预处理的源代码编译成特定处理器的汇编代码。> gcc -S hello.i该
-S选项指定生成汇编代码,而不是目标代码。生成的程序集文件是“hello.s”。 - 汇编:汇编器(
as.exe)将汇编代码转换为目标文件“hello.o”中的机器代码。> as -o hello.o hello.s - 链接器:最后,链接器 (
ld.exe) 将目标代码与库代码链接起来,生成一个可执行文件“hello.exe”。> ld -o hello.exe hello.o …库…
详细模式 ( -v )
-v您可以通过启用(详细)选项查看详细的编译过程。例如,
> gcc -v -o hello.exe hello.c
定义宏 ( -D )
您可以使用该选项来定义宏,或使用值定义宏。如果包含空格,则应该用双引号括起来。-Dname-Dname=valuevalue
1.8 Headers (.h), Static Libraries (.lib, .a) and Shared Library (.dll, .so)
静态库与共享库
库是预编译的目标文件的集合,可以通过链接器链接到您的程序中。示例是系统函数,例如printf()和sqrt()。
外部库有两种类型:静态库和共享库。
- 静态库
.a在 Unix 中具有“”(归档文件)或.lib在 Windows 中具有“”(库)的文件扩展名。当您的程序与静态库链接时,程序中使用的外部函数的机器代码将被复制到可执行文件中。可以通过归档程序“ar.exe”创建静态库。 - 共享库的文件扩展名
.so在 Unix 中为“”(共享对象),.dll在 Windows 中为“”(动态链接库)。当您的程序链接到共享库时,可执行文件中只会创建一个小表。在可执行文件开始运行之前,操作系统会加载外部功能所需的机器代码——这个过程称为动态链接。动态链接使可执行文件更小并节省磁盘空间,因为一个库的一个副本可以在多个程序之间共享。此外,大多数操作系统允许所有正在运行的程序使用内存中共享库的一份副本,从而节省内存。无需重新编译程序即可升级共享库代码。
由于动态链接的优势,GCC 默认链接到共享库(如果可用)。
您可以通过“ ”列出库的内容。nm filename
搜索头文件和库(-I、-L和-l)
编译程序时,编译器需要头文件来编译源代码;链接器需要这些库来解析来自其他目标文件或库的外部引用。除非您设置适当的选项,否则编译器和链接器将找不到头文件/库,这对于初次使用的用户来说并不明显。
对于源代码中使用的每个头文件(通过#include指令),编译器会在所谓的包含路径中搜索这些头文件。包含路径是通过选项(或环境变量)指定的。由于头文件的文件名是已知的(例如 , ),编译器只需要目录。-IdirCPATHiostream.hstdio.h
链接器在所谓的库路径中搜索将程序链接到可执行文件所需的库。库路径通过选项(大写后跟目录路径)(或环境变量)指定。此外,您还必须指定库名称。在 Unix 中,库是通过选项指定的(小写字母,没有前缀“ ”和“扩展名)。在 Windows 中,提供全名,例如。链接器需要知道目录和库名称。因此,需要指定两个选项。-Ldir'L'LIBRARY_PATHlibxxx.a-lxxx'l'lib".a-lxxx.lib
默认包含路径、库路径和库
尝试通过“”列出系统中“GNU C 预处理器”使用的默认包含路径cpp -v:
> cpp -v
......
#include "..." search starts here:
#include <...> search starts here:
 /usr/lib/gcc/x86_64-pc-cygwin/6.4.0/include
 /usr/include
 /usr/lib/gcc/x86_64-pc-cygwin/6.4.0/../../../../lib/../include/w32api
尝试以详细模式 ( -v) 运行编译以研究系统中使用的库路径 ( -L) 和库 ( -l):
> gcc -v -o hello.exe hello.c
......
-L/usr/lib/gcc/x86_64-pc-cygwin/6.4.0
-L/usr/x86_64-pc-cygwin/lib
-L/usr/lib
-L/lib
-lgcc_s     // libgcc_s.a
-lgcc       // libgcc.a
-lcygwin    // libcygwin.a
-ladvapi32  // libadvapi32.a
-lshell32   // libshell32.a
-luser32    // libuser32.a
-lkernel32  // libkernel32.a
Eclipse CDT:在 Eclipse CDT 中,您可以通过右键单击项目 ⇒ 属性 ⇒ C/C++ 常规 ⇒ 路径和符号 ⇒ 在“包含”、“库路径”和“库”选项卡下设置包含路径、库路径和库”。这些设置仅适用于所选项目。
1.9 GCC 环境变量
GCC 使用以下环境变量:
PATH: 用于搜索可执行文件和运行时共享库 (.dll,.so)。CPATH:用于搜索头文件的包含路径。在选项中指定的路径之后搜索它。如果在预处理中指定了特定语言,则可用于指定 C 和 C++ 标头。-I<dir>C_INCLUDE_PATHCPLUS_INCLUDE_PATHLIBRARY_PATH:用于搜索链接库的库路径。在 -选项中指定的路径之后搜索它。L<dir>
1.10 检查编译文件的实用程序
对于所有 GNU 实用程序,您可以使用 ” command --help” 列出帮助菜单;或“ ”显示手册页。man command
“文件”实用程序 – 确定文件类型
实用程序“ file”可用于显示目标文件和可执行文件的类型。例如,
$ gcc -c hello.c
$ gcc -o hello.exe hello.o

$ file hello.c
hello.c: C source, ASCII text, with CRLF line terminators

$ file hello.o
hello.o: data

> file hello.exe
hello.exe: PE32 executable (console) x86-64, for MS Windows
“ nm ”实用程序 – 列出目标文件的符号表
实用程序“ nm”列出了目标文件的符号表。例如,
$ nm hello.o
0000000000000000 b .bss
0000000000000000 d .data
0000000000000000 p .pdata
0000000000000000 r .rdata
0000000000000000 r .rdata$zzz
0000000000000000 t .text
0000000000000000 r .xdata
                 U __main
0000000000000000 T main
                 U puts

$ nm hello.exe | grep main
00000001004080cc I __imp___main
0000000100401120 T __main
00000001004010e0 T main
......
“nm”通常用于检查是否在目标文件中定义了特定函数。第二列中的A'T'表示已定义的函数,而 a'U'表示未定义且应由链接器解析的函数。
“ ldd ” 实用程序 – 列出动态链接库
实用程序“ ldd”检查可执行文件并显示它需要的共享库列表。例如,
> ldd hello.exe
ntdll.dll => /cygdrive/c/WINDOWS/SYSTEM32/ntdll.dll (0x7ff9ba3c0000)
KERNEL32.DLL => /cygdrive/c/WINDOWS/System32/KERNEL32.DLL (0x7ff9b9880000)
KERNELBASE.dll => /cygdrive/c/WINDOWS/System32/KERNELBASE.dll (0x7ff9b6a60000)
SYSFER.DLL => /cygdrive/c/WINDOWS/System32/SYSFER.DLL (0x6ec90000)
ADVAPI32.dll => /cygdrive/c/WINDOWS/System32/ADVAPI32 .dll (0x7ff9b79a0000)
msvcrt.dll => /cygdrive/c/WINDOWS/System32/msvcrt.dll (0x7ff9b9100000)
sechost.dll => /cygdrive/c/WINDOWS/System32/sechost.dll (0x7ff9b9000000)
RPCRT4.dll => /cygdrive/c/WINDOWS/System32/RPCRT4.dll (0x7ff9b9700000)
cygwin1.dll => /usr/bin/cygwin1.dll (0x180040000)
2. GNU 制作
” make” 实用程序自动执行从源代码构建可执行文件的日常工作。” make” 使用所谓的makefile,其中包含有关如何构建可执行文件的规则。
您可以发出“ make --help”来列出命令行选项;或“ man make”显示手册页。
2.1 第一个 Makefile 举例
让我们从一个简单的示例开始,通过 make 实用程序将 Hello-world 程序 ( hello.c) 构建为可执行文件 ( )。hello.exe
// hello.c
#include <stdio.h>

int main() {
    printf("Hello, world!\n");
    return 0;
}
创建以下名为“makefile”的文件(没有任何文件扩展名),其中包含构建可执行文件的规则,并保存在与源文件相同的目录中。使用“tab”缩进命令(不是空格)。
all: hello.exe

hello.exe: hello.o
	 gcc -o hello.exe hello.o

hello.o: hello.c
	 gcc -c hello.c

clean:
	 rm hello.o hello.exe
运行“ make”实用程序,如下所示:
> make
gcc -c hello.c
gcc -o hello.exe hello.o
不带参数运行会make启动all. makefilemakefile 由一组规则组成。规则由 3 部分组成:目标、先决条件列表和命令,如下所示:
目标:pre-req-1  pre-req-2 ...
	命令
目标和先决条件用冒号 ( :) 分隔。命令前面必须有一个制表符(不是空格)。
当make被要求评估规则时,它首先在先决条件中查找文件。如果任何先决条件具有关联规则,请先尝试更新这些先决条件。
在上面的示例中,规则“ all”具有先决条件“ hello.exe”。make找不到文件“ hello.exe”,因此它会寻找创建它的规则。规则“ hello.exe”有一个先决条件“ hello.o”。同样,它不存在,因此make寻找创建它的规则。规则“ hello.o”有一个先决条件“ hello.c”。make检查“ hello.c”是否存在并且它比目标(不存在)更新。它运行命令“ gcc -c hello.c”。规则“ hello.exe”然后运行它的命令“ gcc -o hello.exe hello.o”。最后,规则 ” all” 什么都不做。
更重要的是,如果先决条件不比目标新,则不会运行该命令。换句话说,只有当目标与其先决条件相比已经过时时,才会运行该命令。例如,如果我们重新运行 make 命令:
> make
make: Nothing to be done for `all'.
您还可以在make命令中指定要创建的目标。例如,目标“ clean”删除了“ hello.o”和“ hello.exe”。然后您可以运行make无目标,这与“ make all”相同。
> make clean
rm hello.o hello.exe

> make
gcc -c hello.c
gcc -o hello.exe hello.o
尝试修改“ hello.c”并运行make。
笔记:
- 如果命令前面没有制表符,则会收到错误消息“makefile:4: *** missing separator. Stop”。
- 如果
makefile当前目录中没有,则会收到错误消息“make: *** No targets specified and no makefile found.Stop。” - makefile 可以命名为“
makefile”、“Makefile”或“GNUMakefile”,没有文件扩展名。
2.2 更多关于 Makefile
评论与继续
注释以 a 开头,#一直持续到行尾。长行可以通过反斜杠 ( \) 在多行中断开和继续。
规则语法
规则的一般语法是:
目标1 [目标2 ...]:[前置请求-1 前置请求-2 ...]
	[命令1
         命令2
	 ……]
规则通常以这样的方式组织,更一般的规则排在第一位。总体规则通常是名称“ all”,这是make.
虚假目标(或人造目标)
不代表文件的目标称为虚假目标。例如上例中的“ clean”,它只是一个命令的标签。如果目标是一个文件,它将根据其过时的先决条件进行检查。假目标总是过时的,它的命令将被运行。标准虚假目标是:all, clean, install.
变量
变量以 a 开头并用$括号(...)或大括号括起来{...}。单字符变量不需要括号。例如,$(CC),$(CC_FLAGS),$@,$^。
自动变量
在匹配规则后,自动变量由 make 设置。其中包括:
$@: 目标文件名。$*: 没有文件扩展名的目标文件名。$<: 第一个必备文件名。$^:所有先决条件的文件名,以空格分隔,丢弃重复项。$+: 类似于$^,但包含重复项。$?:比目标新的所有先决条件的名称,用空格分隔。
例如,我们可以将之前的 makefile 重写为:
all: hello.exe

# $@ matches the target; $< matches the first dependent
hello.exe: hello.o
	gcc -o $@ $<

hello.o: hello.c
	gcc -c $<

clean:
	rm hello.o hello.exe
虚拟路径 – VPATH & vpath
您可以使用VPATH(大写)指定搜索依赖项和目标文件的目录。例如,
# Search for dependencies and targets from "src" and "include" directories
# The directories are separated by space
VPATH = src include
您还可以使用vpath(小写)来更精确地了解文件类型及其搜索目录。例如,
# Search for .c files in "src" directory; .h files in "include" directory
# The pattern matching character '%' matches filename without the extension
vpath %.c src
vpath %.h include
模式规则
'%'如果没有明确的规则,可以应用使用模式匹配字符作为文件名的模式规则来创建目标。例如,
# Applicable for create .o object file.
# '%' matches filename.
# $< is the first pre-requisite
# $(COMPILE.c) consists of compiler name and compiler options
# $(OUTPUT_OPTIONS) could be -o $@
%.o: %.c
	$(COMPILE.c) $(OUTPUT_OPTION) $<

# Applicable for create executable (without extension) from object .o object file
# $^ matches all the pre-requisites (no duplicates)
%: %.o
$(LINK.o) $^ $(LOADLIBES) $(LDLIBS) -o $@
隐式模式规则
Make 带有大量的隐式模式规则。您可以通过--print-data-base选项列出所有规则。
2.3 样例 Makefile
此示例 makefile 摘自 Eclipse 的“C/C++ Development Guide -Makefile”。
# A sample Makefile
# This Makefile demonstrates and explains
# Make Macros, Macro Expansions,
# Rules, Targets, Dependencies, Commands, Goals
# Artificial Targets, Pattern Rule, Dependency Rule.

# Comments start with a # and go to the end of the line.

# Here is a simple Make Macro.
LINK_TARGET = test_me.exe

# Here is a Make Macro that uses the backslash to extend to multiple lines.
OBJS =  \
 Test1.o \
 Test2.o \
 Main.o

# Here is a Make Macro defined by two Macro Expansions.
# A Macro Expansion may be treated as a textual replacement of the Make Macro.
# Macro Expansions are introduced with $ and enclosed in (parentheses).
REBUILDABLES = $(OBJS) $(LINK_TARGET)

# Here is a simple Rule (used for "cleaning" your build environment).
# It has a Target named "clean" (left of the colon ":" on the first line),
# no Dependencies (right of the colon),
# and two Commands (indented by tabs on the lines that follow).
# The space before the colon is not required but added here for clarity.
clean :
  rm -f $(REBUILDABLES)
  echo Clean done

# There are two standard Targets your Makefile should probably have:
# "all" and "clean", because they are often command-line Goals.
# Also, these are both typically Artificial Targets, because they don't typically
# correspond to real files named "all" or "clean".

# The rule for "all" is used to incrementally build your system.
# It does this by expressing a dependency on the results of that system,
# which in turn have their own rules and dependencies.
all : $(LINK_TARGET)
  echo All done

# There is no required order to the list of rules as they appear in the Makefile.
# Make will build its own dependency tree and only execute each rule only once
# its dependencies' rules have been executed successfully.

# Here is a Rule that uses some built-in Make Macros in its command:
# $@ expands to the rule's target, in this case "test_me.exe".
# $^ expands to the rule's dependencies, in this case the three files
# main.o, test1.o, and  test2.o.
$(LINK_TARGET) : $(OBJS)
  g++ -g -o $@ $^

# Here is a Pattern Rule, often used for compile-line.
# It says how to create a file with a .o suffix, given a file with a .cpp suffix.
# The rule's command uses some built-in Make Macros:
# $@ for the pattern-matched target
# $< for the pattern-matched dependency
%.o : %.cpp
  g++ -g -o $@ -c $<

# These are Dependency Rules, which are rules without any command.
# Dependency Rules indicate that if any file to the right of the colon changes,
# the target to the left of the colon should be considered out-of-date.
# The commands for making an out-of-date target up-to-date may be found elsewhere
# (in this case, by the Pattern Rule above).
# Dependency Rules are often used to capture header file dependencies.
Main.o : Main.h Test1.h Test2.h
Test1.o : Test1.h Test2.h
Test2.o : Test2.h

# Alternatively to manually capturing dependencies, several automated
# dependency generators exist.  Here is one possibility (commented out)...
# %.dep : %.cpp
#   g++ -M $(FLAGS) $< > $@
# include $(OBJS:.o=.dep)
2.4 小结
我在这里介绍了基本的 make 功能,以便您可以阅读和理解用于构建 C/C++ 应用程序的简单 makefile。Make其实挺复杂的,本身就可以被认为是一门编程语言!!
参考资料和资源
- GCC 手册“使用 GNU 编译器集合 (GCC)”@ http://gcc.gnu.org/onlinedocs。
- GNU ‘make’ 手册 @ http://www.gnu.org/software/make/manual/make.html。
- Robert Mecklenburg,“使用 GNU Make 管理项目”,第 3 版,2004 年。


