本文重点介绍 laravel 9 生成站点地图。
我简单解释了 laravel 9 生成站点地图自定义。
我逐步解释了如何在 laravel 9 中创建动态 xml 站点地图。
我将向您展示有关 laravel 9 站点地图 xml 的信息。
基本上,理想情况下,站点地图是以 .xml 扩展名结尾的文件;它是一个简单的文件,其中包含重要的网站页面,并允许网站管理员通知搜索引擎哪些页面可供抓取。
无论您使用什么技术,此站点地图文件不仅限于 laravel,而且确保您必须生成并添加站点地图 xml 文件以通知搜索引擎。
让我们开始下面的例子:
第 1 步:安装 Laravel
首先,我们将从头开始新的 laravel 应用程序。如果您已经创建了项目,则跳过以下步骤。
composer create-project laravel/laravel example-app
第 2 步:创建迁移后和模型
在第二步中,我们需要通过以下命令创建一个新的迁移后模型:
php artisan make:migration create_posts_table
database/migrations/create_posts_table.php
<?php

use Illuminate\Database\Migrations\Migration;
use Illuminate\Database\Schema\Blueprint;
use Illuminate\Support\Facades\Schema;

return new class extends Migration
{
    /**
     * Run the migrations.
     *
     * @return void
     */
    public function up()
    {
        Schema::create('posts', function (Blueprint $table) {
            $table->id();
            $table->string('title');
            $table->string('slug');
            $table->text('body');
            $table->timestamps();
        });
    }

    /**
     * Reverse the migrations.
     *
     * @return void
     */
    public function down()
    {
        Schema::dropIfExists('posts');
    }
};
现在按照以下命令运行迁移:
php artisan migrate
现在,运行以下命令来创建 Post 模型。
php artisan make:model Post
因此,然后将以下代码更新为 Post 模型。app/Models/Post.php
<?php

namespace App\Models;

use Illuminate\Database\Eloquent\Factories\HasFactory;
use Illuminate\Database\Eloquent\Model;

class Post extends Model
{
    use HasFactory;

    protected $fillable = [
        'title', 'slug', 'body'
    ];
}
第 3 步:创建后期工厂
然后,我们将创建 Post 工厂类并使用 tinker 命令生成虚拟记录。所以让我们运行下面的命令来创建后期工厂。
php artisan make:factory PostFactory
database/factories/PostFactory.php
<?php

namespace Database\Factories;

use Illuminate\Database\Eloquent\Factories\Factory;
use App\Models\Post;
use Illuminate\Support\Str;

/**
 * @extends \Illuminate\Database\Eloquent\Factories\Factory<\App\Models\Post>
 */
class PostFactory extends Factory
{
    /**
     * The name of the factory's corresponding model.
     *
     * @var string
     */
    protected $model = Post::class;
    /**
     * Define the model's default state.
     *
     * @return array

     */
    public function definition()
    {
        return [
            'title' => $this->faker->text(),
            'slug' => Str::slug($this->faker->text()),
            'body' => $this->faker->paragraph()
        ];
    }
}
然后只需运行 tinker 命令并创建虚拟帖子。
php artisan tinker

App\Models\Post::factory()->count(30)->create();
第 4 步:创建路线
routes/web.php
<?php

use Illuminate\Support\Facades\Route;
use App\Http\Controllers\SitemapController;

/*
|--------------------------------------------------------------------------
| Web Routes
|--------------------------------------------------------------------------
|
| Here is where you can register web routes for your application. These
| routes are loaded by the RouteServiceProvider within a group which
| contains the "web" middleware group. Now create something great!
|
*/

Route::get('sitemap.xml', [SitemapController::class, 'index']);
第 5 步:创建新控制器
在第二步中,我们需要创建一个新的 SitemapController;在这个文件中,我们将为渲染视图和存储图像逻辑添加两个方法 index() 和 store()。
让我们通过以下命令创建 SitemapController:
php artisan make:controller SitemapController
app/Http/Controllers/SitemapController.php
<?php

namespace App\Http\Controllers;

use Illuminate\Http\Request;
use App\Models\Post;

class SitemapController extends Controller
{
    /**
     * Write code on Method
     *
     * @return response()
     */
    public function index($value='')
    {
        $posts = Post::latest()->get();

        return response()->view('sitemap', [
            'posts' => $posts
        ])->header('Content-Type', 'text/xml');
    }
}
第 6 步:创建Blade文件
在最后一节中,我们需要使用 sitemap.blade.php 来显示所有帖子并输入以下代码:resources/views/sitemap.blade.php
<?php echo '<?xml version="1.0" encoding="UTF-8"?>'; ?>
<urlset xmlns="http://www.sitemaps.org/schemas/sitemap/0.9">
    @foreach ($posts as $post)
        <url>
            <loc>{{ url('/') }}/post/{{ $post->slug }}</loc>
            <lastmod>{{ $post->created_at->tz('UTC')->toAtomString() }}</lastmod>
            <changefreq>daily</changefreq>
            <priority>0.8</priority>
        </url>
    @endforeach
</urlset>
运行 Laravel 应用程序:
所有步骤都已完成,现在您必须输入给定的命令并按回车键来运行 laravel 应用程序:
php artisan serve
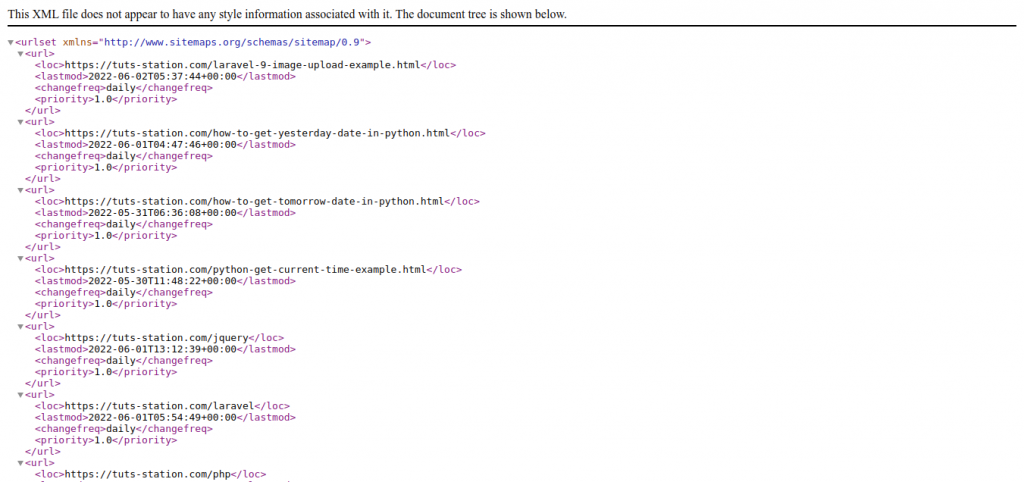
现在,转到您的网络浏览器,输入给定的 URL 并查看应用程序输出:
http://localhost:8000/sitemap.xml
输出 :
我希望它可以帮助你…
